|
 Tutorial: Stripping & Polishing Pics
#114512
06/24/07 02:55 PM Tutorial: Stripping & Polishing Pics
#114512
06/24/07 02:55 PM
|
Joined: Feb 2007
Posts: 14,586
Horn Dog
 OP
OP
Junk Yard Dog
|
|
OP
Junk Yard Dog
Joined: Feb 2007
Posts: 14,586 |
Last edited by Horn Dog; 11/19/07 08:14 PM.
|
|
|
|
Re: Tutorial: Stripping & Polishing Pics
[Re: Horn Dog]
#114513
06/24/07 03:02 PM
|
Joined: Feb 2007
Posts: 14,586
Horn Dog
OP
Junk Yard Dog
|
|
OP
Junk Yard Dog
Joined: Feb 2007
Posts: 14,586 |
After it bubbles and loosens, wash off the paint with a garden hose. You can use plastic scrapers or wire brushes to remove more stubborn paint. It may take two applications to get it all. Look how unfinished and rough the spine is. ![[Linked Image from i173.photobucket.com]](http://i173.photobucket.com/albums/w64/rivershaman/RANGER/Tutorial011.jpg) This will take some work on the belt sander. I started with ordinary 80 grit, just to get the steel off. As you can see, the stripper has discolored the blade. ![[Linked Image from i173.photobucket.com]](http://i173.photobucket.com/albums/w64/rivershaman/RANGER/Tutorial012.jpg) Cleaning up this choil will take some work with the Dremel tool. ![[Linked Image from i173.photobucket.com]](http://i173.photobucket.com/albums/w64/rivershaman/RANGER/Tutorial013.jpg)
Last edited by Horn Dog; 11/19/07 08:17 PM.
Horned, dangerous, and off my medication.
|
|
|
|
Re: Tutorial: Stripping & Polishing Pics
[Re: Horn Dog]
#114514
06/24/07 03:08 PM
|
Joined: Feb 2007
Posts: 14,586
Horn Dog
OP
Junk Yard Dog
|
|
OP
Junk Yard Dog
Joined: Feb 2007
Posts: 14,586 |
The Scotchbrite wheels easily remove the discoloration in just a few minutes of work. ![[Linked Image from i173.photobucket.com]](http://i173.photobucket.com/albums/w64/rivershaman/RANGER/Tutorial014.jpg) I'll use this sanding drum on the Dremel tool to clean up the choil as best I can. Be sure to wear eye protection. The Dremel throws some serious sparks! ![[Linked Image from i173.photobucket.com]](http://i173.photobucket.com/albums/w64/rivershaman/RANGER/Tutorial035.jpg) This one very bad area may just have to remain. Those are some deep tool marks. ![[Linked Image from i173.photobucket.com]](http://i173.photobucket.com/albums/w64/rivershaman/RANGER/Tutorial019-1.jpg) The rough spine is coming along. Time to switch to a finer 80u finishing belt. ![[Linked Image from i173.photobucket.com]](http://i173.photobucket.com/albums/w64/rivershaman/RANGER/Tutorial020.jpg)
Last edited by Horn Dog; 11/19/07 08:24 PM.
Horned, dangerous, and off my medication.
|
|
|
|
Re: Tutorial: Stripping & Polishing Pics
[Re: Horn Dog]
#114515
06/24/07 03:13 PM
|
Joined: Feb 2007
Posts: 14,586
Horn Dog
OP
Junk Yard Dog
|
|
OP
Junk Yard Dog
Joined: Feb 2007
Posts: 14,586 |
Last edited by Horn Dog; 11/19/07 08:32 PM.
Horned, dangerous, and off my medication.
|
|
|
|
Re: Tutorial: Stripping & Polishing Pics
[Re: Horn Dog]
#114516
06/24/07 03:15 PM
|
Joined: Mar 2007
Posts: 15,885
WhichDawg
Junk Yard Dog
|
|
Junk Yard Dog
Joined: Mar 2007
Posts: 15,885 |
good going Reverend, I'm glued! That's the older model RD6, I have an older RD7 but satin. Yours is gonna look shweeeet!
I was battoning the other day with it, 5" log and was whacking around the front of the G-10 scales and after, I noticed they had shifted some, I was surprised (but no damage or even a scratch!). But like you said their easy to remove or loosen.
JYD#18
"Server Slayer"
|
|
|
|
Re: Tutorial: Stripping & Polishing Pics
[Re: Horn Dog]
#114517
06/24/07 03:17 PM
|
Joined: Feb 2007
Posts: 14,586
Horn Dog
OP
Junk Yard Dog
|
|
OP
Junk Yard Dog
Joined: Feb 2007
Posts: 14,586 |
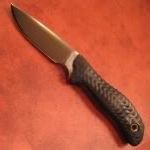
The back of the handle looks pretty good to me and feels smooooth! ![[Linked Image from i173.photobucket.com]](http://i173.photobucket.com/albums/w64/rivershaman/Tutorial024.jpg) The bottom is not quite as good, but I can live with it. ![[Linked Image from i173.photobucket.com]](http://i173.photobucket.com/albums/w64/rivershaman/Tutorial025.jpg) The tang extension came out pretty good considering the complex shape. ![[Linked Image from i173.photobucket.com]](http://i173.photobucket.com/albums/w64/rivershaman/Tutorial026.jpg) ![[Linked Image from i173.photobucket.com]](http://i173.photobucket.com/albums/w64/rivershaman/Tutorial027.jpg) FINI.
Horned, dangerous, and off my medication.
|
|
|
|
Re: Tutorial: Stripping & Polishing Pics
[Re: Horn Dog]
#114518
06/24/07 03:21 PM
|
Joined: Mar 2007
Posts: 15,885
WhichDawg
Junk Yard Dog
|
|
Junk Yard Dog
Joined: Mar 2007
Posts: 15,885 |
Horn-Angelo-Dog! the 3rd world sculptor <img src="/ubbthreads/images/graemlins/laugh.gif" alt="" /> Great job and thanks for the toot!
JYD#18
"Server Slayer"
|
|
|
|
Re: Tutorial: Stripping & Polishing Pics
[Re: WhichDawg]
#114519
06/24/07 03:52 PM
|
Joined: Oct 2006
Posts: 1,769
Jerrwhy
Junk Yard Dog
|
|
Junk Yard Dog
Joined: Oct 2006
Posts: 1,769 |
Now I'm going to have to go out and get some scotch brite pads for my grinder.
Klaatu... verada... necktie
The 16th Dog!
|
|
|
|
Re: Tutorial: Stripping & Polishing Pics
[Re: WhichDawg]
#114520
06/24/07 03:53 PM
|
Joined: Feb 2007
Posts: 14,586
Horn Dog
OP
Junk Yard Dog
|
|
OP
Junk Yard Dog
Joined: Feb 2007
Posts: 14,586 |
Thank you, WD. I gotta go clean up my mess and start Sunday dinner for da yoots. Here are some final "poses" along side the beautiful Busse Steel Heart. Can't make a silk purse out of a sows ear. In many cases it is cheaper and easier just to go ahead and buy a finished knife, but I already had this RD sitting around being ugly. ![[Linked Image from i173.photobucket.com]](http://i173.photobucket.com/albums/w64/rivershaman/Tutorial028.jpg) ![[Linked Image from i173.photobucket.com]](http://i173.photobucket.com/albums/w64/rivershaman/Tutorial029.jpg) ![[Linked Image from i173.photobucket.com]](http://i173.photobucket.com/albums/w64/rivershaman/Tutorial032.jpg)
Horned, dangerous, and off my medication.
|
|
|
|
Post deleted by Private Klink
[Re: Horn Dog]
#114521
06/24/07 04:12 PM
|
|
Anonymous
Unregistered
|
|
Anonymous
Unregistered
|
|
|
|
|
Re: Tutorial: Stripping & Polishing Pics
#114522
06/24/07 04:22 PM
|
Joined: Feb 2007
Posts: 3,574
james_bond
Junk Yard Dog
|
|
Junk Yard Dog
Joined: Feb 2007
Posts: 3,574 |
The best test would be to enter both blades in the Third World Chopathon and see how they hold up. <img src="/ubbthreads/images/graemlins/wink.gif" alt="" />
Is there such thing as the "Third World Chopathon" or it that bld522 special? Anyways thank you Viking Vic, very informative.
JYD #25
Clinging to my Guns, Religion, and Scrapyards.
|
|
|
|
Re: Tutorial: Stripping & Polishing Pics
#114523
06/24/07 04:37 PM
|
Joined: Jan 2007
Posts: 2,943
KnifeGuy
Junk Yard Dog
|
|
Junk Yard Dog
Joined: Jan 2007
Posts: 2,943 |
Awesome tutorial HD.
I use more or less the same method. I have been using sanding belts and Dremel. I need to get some Scotchbrite wheels.
----
Worth mentioning:
1) Use that stripper with GOOD ventilation. The gel formula slows down the evaporation and fumes. So, it is not as noticable. But, those are some seriously dangerous fumes. No telling what type of brain damage or cancer can be caused by that stuff (?????)
2) I have heard that micarta dust is very dangerous if inhaled. I assume something to do with the resin and/or epoxy. Use a dust mask to be sure.
3) You should be very careful to not over-heat the blade with sanders, Dremels and especially grinders. The friction created by grinding can quickly and easily create enought heat to mess up the blade tempering. Dremels and especially grinders create excessive heat very fast. I would never use a grinder - too hard to control the heat. A Bench grinder will make steel glow red in seconds! But, even heavy hard use of a Dremel can build up too much heat. Use Dremel and belt sanders lightly and slowly. I assume the Scotchbrite wheels don't create too much heat very fast (????).
4) I second leaving the scales on a Rat. The stripper does not hurt the handles. And I have heard it helps to leave the coating on under the scales to prevent rust. Once stripped on the visible blade, you can't see the coating under the scales anyway. I assume you could leave the scales on a Busse just as well. I never removed the scales on my SJTAC when I stripped it. It looks fine.
The problem is that it is much harder to sand and finish a blade around the scales especially at the blade side of the guard. But, the extra effort is probably about a wash compared to drilling out the gromets, shipping the knife, paying for shipping and waiting "two weeks" for it to be shipped back. (??????)
*** Everyone should probably be fore-warned that the Busse family of blades tend to be fairly rough under the coatings. The rough parts are usually on the flat parts of the blade. The primary blade grinds are usually pretty decent. The flat areas take a fair amount of sanding to get smooth - if that is your goal.
.
JYD #39
I prefer "SATIN" blades!!!
|
|
|
|
|


![[Linked Image from i173.photobucket.com]](http://i173.photobucket.com/albums/w64/rivershaman/RANGER/Tutorial003.jpg)
![[Linked Image from i173.photobucket.com]](http://i173.photobucket.com/albums/w64/rivershaman/RANGER/Tutorial005.jpg)
![[Linked Image from i173.photobucket.com]](http://i173.photobucket.com/albums/w64/rivershaman/RANGER/Tutorial033.jpg)
![[Linked Image from i173.photobucket.com]](http://i173.photobucket.com/albums/w64/rivershaman/RANGER/Tutorial034.jpg)
![[Linked Image from i173.photobucket.com]](http://i173.photobucket.com/albums/w64/rivershaman/RANGER/Tutorial006.jpg)
![[Linked Image from i173.photobucket.com]](http://i173.photobucket.com/albums/w64/rivershaman/RANGER/Tutorial021.jpg)
![[Linked Image from i173.photobucket.com]](http://i173.photobucket.com/albums/w64/rivershaman/RANGER/Tutorial024.jpg)
![[Linked Image from i173.photobucket.com]](http://i173.photobucket.com/albums/w64/rivershaman/RANGER/Tutorial025.jpg)
![[Linked Image from i173.photobucket.com]](http://i173.photobucket.com/albums/w64/rivershaman/RANGER/Tutorial026.jpg)
![[Linked Image from i173.photobucket.com]](http://i173.photobucket.com/albums/w64/rivershaman/RANGER/Tutorial023.jpg)